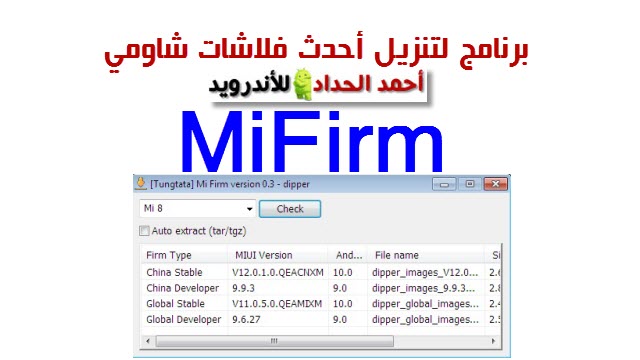
برنامج MiFirm لتنزيل أحدث فلاشات شاومي
السلام عليكم ورحمة الله وبركاته
أرحب بك أخي زائر مدونة أحمد الحداد للأندرويد
واتمنى أن تكون في أتم الصحة والسلامة
وبعد موضوعنا في هذه التدوينة حول
برنامج MiFirm لتنزيل أحدث فلاشات شاومي
ليعمل البرنامج يجب الاتصال بالنت وتحديد موديل الهاتف وسوف يعرض البرنامج أحدث الفلاشات بكل اصداراتها
الفلاشات العالمية
فلاشات صينية
وغيرها
رابط التحميل
CLICK HERE
باسوورد فك الضغط
AHMED_HADDAD
اداة فك بوتلودر شاومي MI UNLOCK BOOTLOADER
الاداة مدفوعة تم نقلها من هنا
طبعا المكافح يعتبرها فيروس لذا وجب التنبيه
الرابط
رابط صفحة الفيس بوك
رابط الصفحة على تويتر
انضم لقناتنا على تيليجرام
Unlock LG LS675 All Versions
LG LS 675 Repair Network
فك شفرة unlock LG LS675 ZV9
👇
LG Tribute 5 LS675 UNLOCK
need unlock lg ls675
lg ls675 how to unlock
Unlock Sprint LG LS675 Tribute 5
Unlock LG LS775 All Versions
unlock for LG LS775 ZVB
Unlock LG LS775
👇
فك شفرة LG LS775ZVB
Unlock LG LS775ZVB Without Box
فك شفرة ال جي LS775
LG LS775 ZVB Unlocked by Octopus Box
روم SM-G9350 بعدة روابط مع روت وكومبيشن
الأولى تفاصيلها
G9350ZHS4CSG3_G9350ZZH4CSG3_TGY_9.0_Full
الرابط على androidfilehost
الروم الثانية تفاصيلها
G9350ZCS4CSB3_G9350BHC4CSB3_CHC_8.0_Full
الرابط على androidfilehost
الروم الثالثة تفاصيلها
G9350_G9350ZCS3CRJ2_G9350CHC3CRJ2_CHC_8.0_5Files
الرابط على google drive
الروم الرابعة تفاصيلها
G9350_G9350ZHS3CRJ2_G9350ZZH3CRJ2_TGY_8.0_5Files
الرابط على google drive
روت cf auto root g9350
روم كومبنيشن g9350
COMBINATION_FA60_G9350ZCU2APL1
روم كومبنيشن g9350
COMBINATION_FA60_G9350ZCU3ARH1
الرابط على Mega
روم SM-G9350 بعدة روابط مع روت وكومبيشن
الأولى تفاصيلها
G9350ZHS4CSG3_G9350ZZH4CSG3_TGY_9.0_Full
الرابط على androidfilehost
الروم الثانية تفاصيلها
G9350ZCS4CSB3_G9350BHC4CSB3_CHC_8.0_Full
الرابط على androidfilehost
الروم الثالثة تفاصيلها
G9350_G9350ZCS3CRJ2_G9350CHC3CRJ2_CHC_8.0_5Files
الرابط على google drive
الروم الرابعة تفاصيلها
G9350_G9350ZHS3CRJ2_G9350ZZH3CRJ2_TGY_8.0_5Files
الرابط على google drive
روت cf auto root g9350
روم كومبنيشن g9350
COMBINATION_FA60_G9350ZCU2APL1
رابط آخر لنفس الروم لكن من موقع اخر
روم كومبنيشن g9350
COMBINATION_FA60_G9350ZCU3ARH1
الرابط على Mega
رابط صفحة الفيس بوك
رابط الصفحة على تويتر
انضم لقناتنا على تيليجرام
روم اصلاح Samsung Galaxy A20 SM-A205U1
تعتبر الروم ذات الاربع ملفات لجهاز A205U1 قليلة الوجود ضمن المواقع على الانترنت ولا يتم نشرها بشكل كبير رغم أنها روم كاملة وتحتوي على الملفات التالية BL , AP , CP , CSC ومن شركة سامسونج أيضاً لكن شركة سامسونج تقوم بنشر هذه الرومات على نطاق محدود لأنها لا تستخدم من أجل عملية تحديث نظام الاندرويد وإنما تستخدم من أجل إصلاح المشاكل الكبيرة ففي بعض الأحيان يحدث مشاكل بملفات النظام داخل الجهاز لا يمكن إصلاح نظام الاندرويد بإستخدام الفلاشة العادية ذات الملف الواحد حيث انها لا تحتوي على جميع الملفات مثل ملفات البوت لودر و ملفات المودم وملفات اللغة الخاصة بالجهاز لذلك تستخدم الروم الكاملة (اربع ملفات) من أجل مسح جميع محتويات الجهاز بشكل كامل وإعادة ضبط المصنع للجهاز.
وتتكون هذه الرومات Repair Firmware
ملف PIT هذا الملف قد لا يأتي مع كل الرومات وهو مسؤول عن تقسيم الجهاز ولا يتم إستخدامه إلى مع الأجهزةالمناسبة بالحجم له أي إن كان هذا الملف مخصص للنسخ ذات الحجم 8 جيجا مثلا فلا يمكن إستخدامه مع جهاز مساحة 16 جيجا حيث أن لهذا الجهاز ملف مختلف له.
ملف BL أي Bootloader وهو الملف المسؤول عن ملفات البوتلودر.
ملف AP أو PDA أو CODE بحسب إصدار الروم وهو الملف الأساسي وذو حجم كبير وهو ما يكافئ الروم ذات الملف الواحد فهو يحتوي على ملفات النظام.
ملف CP أو PHONE أو MODEM بحسب إصدار الروم وهو الملف المسؤول عن تعريف الموديم الخاص بالجهاز.
ملف CSC هو الملف المسؤول عن ملفات البلد الموجه إليه الروم.
مواصفات جهاز Galaxy A20
الشاشة:
-النوع: Super AMOLED capacitive.
-الحجم: 6.4 بوصة.
العتاد:
-نظام التشغيل: اندرويد بي 9.0.
-نوع المعالج: Exynos 7884.
-سرعة المعالج: Octa-core (2x1.6 GHz & 6x1.35 GHz).
-المعالج الرسومي: Mali-G71.
الزاكرة:
-كرت الزاكرة: تقبل الى حد 512 غيغا بايت.
-الزاكرة الداخلية: 32 جيجا , 3 جيجا رام.
الكميرا:
-الخلفية: 5MP / 13MP.
-الامامية: 8MP.
مراجعة جهاز Galaxy A20
الملفات المطلوبة لأتمام عملية التفليش
ملاحظات قبل البدء بعملية التفليش
1-قبل تحميل الروم تأكد من اصدار الروم واصدار الحماية كي لا تقع بالمشاكل.
2-استخدم برنامج الاودين اصدار 3.13.
3-في حال وجود عطل في الروابط الرجاء الاتصال بنا.
روابط التحميل
↓↓↓↓↓
(T-Mobile)↓
(Sprint)↓
(Boost Mobile)↓
(Verizon)↓
(AT&T)↓
طريقة تفليش Galaxy A20 SM-A205U1
بعد تحميل جميع الملفات والروم المناسب نقوم بتثبيت التعاريف على جهاز الكمبيوتر ونقوم بفك الضغط عن الروم ببرنامج 7z سوف يظهر لك خمس ملفات BL , AP , CP , CSC , Home CSC ثم نفتح برنامج الاودين.
من خانة BL نختار الملف BL_A205U1 , ومن خانة AP نختار الملف الملف AP_A205U1 , ومن خانة CP نختار الملف الملف CP_A205U1 , ومن خانة CSC نختار الملف الملف CSC_A205U1 في حال اردت حذف جميع البيانات على الجهاز او Home CSC_A205U1 في حال اردت الاحتفاظ بالبيانات.
نقوم بايقاف تشغيل الجهاز ومن ثم ادخاله الى وضع Download Mode عن طريق مفتاح خفض الصوت + رفع الصوت + توصيل كبل USB.
نقوم بتوصيل الجهاز بالكمبيوتر ثم الضغط على Start لبدء عملية تفليش الجهاز تستغرق العملية حوالي 10 دقائق.
بعد انتهاء التفليش سوف يقوم الجهاز باعادة التشغيل بشكل اتوماتيكي وبعدها سوف يدخل في مرحلة اعداد النظام تستغرق عملية اعداد النظام حوالي 5 دقائق بعد اكتمال تهيئة نظام التشغيل يتوجب عليك ادخال بعض الاعدادات الروتينة كأسم الجهاز وتوصيل الواي فاي واضافة حساب جوجل.
ملف PIT لجهاز Samsung Galaxy A20 SM-A205U1
يستخدم ملف PIT لجهاز A205U1 عادة مع الرومات التي تحتوي على 4 ملفات و يجب ان يكون متوافق مع الجهاز ومع حجم الذاكرة للجهاز فهو بدوره يقوم بأعادة تقسيم الذاكرة الداخلية وهي عملية تسمى Repartition
كل ما تود معرفته عن ملف PIT
هو ملف يستخدم لتقسيم الذاكرة الداخلية للجهاز ويستخدم في حالات معينة.
ما هو ال Re-Partition: هو خيار موجود في برنامج ال ODIN يستخدم ملف ال PIT لاتمام عملية تقسيم الذاكرة.
بعد هذه النبذة لناخذ بالكلام المعقد نوعأ ما سنشرح لك الموضوع باخذ مثال لدينا في جهاز الحاسوب (نظام ويندوز) تقسيم القرص الصلب الى اقسام منها: C , D , E , F لاكن النظام او الاخص ملف النظام وبرامجه موجودة في قرص ال C على الاغلب هنالك قرص لم نذكره لانه في حالته الطبيعية لايظهر لانة ليس له مسار معين لاكنه موجود وله اهمية كبيره وبدونة لا يعمل النظام ويسما ال SYSTEM RESERVED وتعريفات الحاسوب على الاجهزة وملف النظام وبرامجه تمثل تقسيمة ال PTI على النحو الاتي المبين في الصورة
بعد ضرب هذا المثال سنتعرف ماهي الحالات التي يتم استخدام ال PIT و ال Re-Partition لايستخدم هذا الملف الا قليا عندما يكون جزء من النظام فمثلا الروم المكمل الرسمي او الغير رسمي ياتي بعدة ملفات ويكون منها ملف ال pit ساعتها بتستخدم الملف لاكن بدون استخدام خيار Re-Partition.
عندما يتم استخدام ال odin بطريقة خاطئة مثلا استخدام ملفات جهاز اخر لجهاز ما او تركيب الملفات في الخانات دون مراعاة اماكنها عندها تحتاج الى ملف ال pit وتفعيل خيار Re-Partition.
الملفات المطلوبة لتفليش ملف PIT A205U1
طريقة تفليش ملف Pit عن طريق الاودين
بعد تحميل ملفات الاودين و التعاريف و الروم ذات الاربع ملفات واخيرا ملف Pit نقوم بتثبيت التعاريف على جهاز الكمبيوتر ونقوم بفك الضغط عن الروم ببرنامج 7z سوف يظهر لك اربع ملفات BL , AP , CP , CSC ثم نفتح برنامج الاودين.
ثم نقوم باضافة ملفات الروم كل قسم في مكانه BL=BL , AP=AP , CP=CP , CSC=CSC ثم من القسم العلوي فوق خيار BL نقوم بوضع ملف PIT في قسم PIT.
نقوم بايقاف تشغيل الجهاز ومن ثم ادخاله الى وضع Download Mode عن طريق مفتاح خفض الصوت + رفع الصوت + توصيل كبل USB.
نقوم بتوصيل الجهاز بالكمبيوتر ثم الضغط على Start لبدء عملية تفليش الجهاز تستغرق العملية حوالي 10 دقائق.
بعد انتهاء التفليش سوف يقوم الجهاز باعادة التشغيل بشكل اتوماتيكي وبعدها سوف يدخل في مرحلة اعداد النظام تستغرق عملية اعداد النظام حوالي 5 دقائق بعد اكتمال تهيئة نظام التشغيل يتوجب عليك ادخال بعض الاعدادات الروتينة كأسم الجهاز وتوصيل الواي فاي واضافة حساب جوجل.
REMOVE FRP HUAWEI Y9 | Y9 Prime 2019 FRP / Android/EMUI 9.1.0 / Safe Mode Fix / No Test Point
Huawei Y9 2019 JKM-LX1 FRP/Google Lock Bypass Android/EMUI 9.1.0 WITHOUT PC
Huawei Y9 2019 JKM-LX2 FRP/Google Lock Bypass Android/EMUI 9.1.0 WITHOUT PC
Huawei Y9 2019 JKM-LX3 FRP/Google Lock Bypass Android/EMUI 9.1.0 WITHOUT PC
Huawei Y9 2019 JKM-L21 FRP/Google Lock Bypass Android/EMUI 9.1.0 WITHOUT PC
Huawei Y9 2019 JKM-L22 FRP/Google Lock Bypass Android/EMUI 9.1.0 WITHOUT PC
Huawei Y9 2019 JKM-AL00 FRP/Google Lock Bypass Android/EMUI 9.1.0 WITHOUT PC
Huawei Y9 2019 JKM-TL00 FRP/Google Lock Bypass Android/EMUI 9.1.0 WITHOUT PC
Huawei Y9 Prime 2019 STK-LX1 FRP/Google Lock Bypass Android/EMUI 9.1.0 WITHOUT PC
Huawei Y9 Prime 2019 STK-LX2 FRP/Google Lock Bypass Android/EMUI 9.1.0 WITHOUT PC
Huawei Y9 Prime 2019 STK-LX3 FRP/Google Lock Bypass Android/EMUI 9.1.0 WITHOUT PC
Huawei Y9 Prime 2019 STK-L21 FRP/Google Lock Bypass Android/EMUI 9.1.0 WITHOUT PC
Huawei Y9 Prime 2019 STK-L22 FRP/Google Lock Bypass Android/EMUI 9.1.0 WITHOUT PC
Huawei Y9 Prime 2019 STK-AL00 FRP/Google Lock Bypass Android/EMUI 9.1.0
Huawei Y9 Prime 2019 STK-TL00 FRP/Google Lock Bypass Android/EMUI 9.1.0
Watch the video
Source: Mohammad Ali
FRP SAMSUNG GALAXY NOTE 9 / PLUS ANDROID 9.0
FRP SAMSUNG GALAXY NOTE 8 / PLUS ANDROID 9.0
FRP SAMSUNG GALAXY S9 / PLUS ANDROID 9.0
FRP SAMSUNG GALAXY S8 / PLUS ANDROID 9.0
2019/10/20
SAMSUNG Note8 SM-N9500 FRP
SAMSUNG Note8 SM-N950U FRP
SAMSUNG Note8 SM-N950U1 FRP
SAMSUNG Note8 SM-N950W FRP
SAMSUNG Note8 SM-N950F FRP
SAMSUNG Note8 SM-N950FD FRP
SAMSUNG S8 SM-G950FD FRP
SAMSUNG S8 SM-G9500 FRP
SAMSUNG S8 SM-G950F FRP
SAMSUNG S8 SM-G950U FRP
SAMSUNG S8 SM-G950U1 FRP
SAMSUNG S8 SM-G950W FRP
SAMSUNG S8 SM-G950X FRP
Watch the video
Source: Mohammad Ali
Bypass FRP Google Account Android 7.0 | 8.0
Bypass FRP.J7 , Remove FRP.J7 , Unlock FRP J7
Bypass FRP.J3 , Remove FRP.J3 , Unlock FRP J3
SM-J327P , SM-J327V , SM-J327VPP ,SM-J327R4
SM-J727T , SM--J727T1 , SM-J327T , SM-J327T1
SM-J327R6 , SM-J327R7 ,SM-J327A SM-J327AZ
SM-J327R6 , SM-J327R7 ,SM-J327A SM-J327AZ
SM-S337TL , SM-737TL
SM-J727P , SM-J727V , SM-J727VPP ,SM-J727R4
SM-J727R6 , SM-J727R7 ,SM-J727A SM-J727AZ
شرح كيف تخطي حساب FRP هواتف سامسنج J7 و J3
بدون كمبيوتر للمبرمجين المبتدئين لانحتاج الى تفليش بوات
او تفليش فلاشة كمبنيشن فقط عبر تطبيقات يتم نسخهاء
الى ذاكره خارجية واستخدمهاء عند عملية تخطي الحساب
هاذي الطريقة تعمل على جميع هواتف سامسنج J7 و J3
بجميع موديلاتهاء المذكوره اعلا الموضوع و اصدراتهاء الاندرويد 7.0 | 8.0
يمكنك متابعة الشرح من خلال قناتناء على اليوتيوب من هناء
او من الفيديو المرفق في الموضوع
لتحميل التطبيقات المستخدمة في عملية التخطي من هناء
الموقع المستخدم اثناء عملية التخطي BassYe.Com/Frp
Link - Bypass FRP BassYe.Com/Frp
شرح الفيديو كيفية عملية التخطي
تنوية هام
يرجاء من الاخوة اصحاب المدونات عدم النسخ والمشاركة على المدونات الخاصة بهم
جميع الحقوق محفوظة لدى AlseerY-SofT
What is the root and what are the benefits and harms
Root is a program that gives the user full powers to control the operating system where it can modify the operating system files or delete in the sense of the most complete control of the phone.
Root features:
1-Modify or delete files or applications of the operating system.
2-Run programs that require root permissions.
3-Change the basic fonts within the Android system.
4-Move applications from device memory to external memory.
5-Installation of Custom rom.
6-Fix errors DRK and DM-Verity.
Cons of the root:
1-Loss of phone warranty.
2-Some applications do not work due to root (bluestacks root / dr fone root).
3-Stand on the company logo as a result of misuse.
4-The operating system crashed due to deletion or modification of important system files.
important warning:
- Installation and use of the root android is entirely at your own risk and we do not take any responsibility for device failure.
- In older versions of the Android system such as Jelly Bean and KitKat was using apps (kingroot / kingo root / framaroot / iroot / root king / towelroot) To get root permissions either in new versions such as Lollipop, Marshmallow, Nougat, Pie and future versions of the Android system, these applications do not work.
What is the difference between SuperSU and Magisk
The main difference between Magisk and SuperSU is how the root works on Android. Based on what the user wants to do.
We will first talk about supersu root how to get the root where it installs itself within the system files It changes the system files and adds new files to the system partition on the phone, but with the enhancement of Google to protect Android it has become difficult to do so that the amendment to the partition of the Android system to send an alert to applications that are trying to detect the presence of root.
Google SafetyNet monitors the operating system from any manipulation, and when it detects any manipulation in the Android operating system, most applications will not work and will not send you OTA updates.
What about Magisk is one of the most important features that does not touch system files, but modifies the boot partition instead so that it can trick safetyNet service and show that everything is normal and allows Magisk Manager to fully control the root settings.
Notes before root process
- Charge the battery well before use.
- Use the original USB cable that came with the device.
- Use the laptop at work to avoid electricity problems.
- You should focus well to protect the binary of your device.
- The following protections must be disabled (FRP - OEM - RMM/KG) Follow the following article to learn How to Disbled FRP and OEM for device Samsung Galaxy.
Device information
-Brand Name: Samsung Galaxy
-Device Name: Galaxy A90
-Model: SM-A9080 root
-Operating system: Android Pie 9.0
Files required for root work
How To Root Galaxy A9080 android Pie 9.0
1-Download Drivers, Odin and A9080 Root files for Pie 9.0 Depending on your device version.
2-Install the drivers on your device.
3-Install the Magisk Manager app on your Phone.
4-Transfer the boot file to the device's memory after extracting the file.
5-The entire file name will become boot.img.
5-Open the Magisk Manager app.
6-Open the application settings and from the option Patched Boot Output Formate We choose .img.tar.
7-We return to the main interface of the application And we click on install a new window will appear we choose install too.
8-A new window will appear titled Select Patched We choose the second option Patch Boot Image File.
9-Locate the boot file and give the application access rights.
10-Patch Boot will take some time about 5 minutes.
11-After the process is finished navigate to the MagiskManager folder or Download folder you will see the file named patched_boot.img.tar (mroot A9080).
12-Copy the file to your computer and open the Odin tool.
13-Of the box AP We choose the file (patched_boot.img.tar).
14-Boot your device into download mode prees Volume Down + Volume Up and connect the USB cable.
15-Press Start to flash the boot file.
16-After the flash is done, you will be asked to work factory reset.
17-It will take about 10 minutes to boot the Android system.
18-After the boot is complete we install the Magisk Manager application.
19-After installing the app you need to reboot your device to get root permissions.
20-You can check for root access through the root checker app.
21-In case you encounter any problems please feel free to contact us
22-If you want to unroot or revert to the offical firmware, you can read the following article: Full Firmware For Device Samsung Galaxy A90 SM-A9080
الاشتراك في:
الرسائل (Atom)


