Halaman

    Social Items

What is the root and what are the benefits and harms

Root is a program that gives the user full powers to control the operating system where it can modify the operating system files or delete in the sense of the most complete control of the phone.
How To Root Samsung Galaxy Note 20 5G SM-N9810

Root features:
1-Modify or delete files or applications of the operating system.
2-Run programs that require root permissions.
3-Change the basic fonts within the Android system.
4-Move applications from device memory to external memory.
5-Installation of Custom rom.
6-Fix errors DRK and DM-Verity.

Cons of the root:
1-Loss of phone warranty.
2-Some applications do not work due to root (bluestacks root / dr fone root).
3-Stand on the company logo as a result of misuse.
4-The operating system crashed due to deletion or modification of important system files.


important warning:
  • Installation and use of the root android is entirely at your own risk and we do not take any responsibility for device failure.
  • In older versions of the Android system such as Jelly Bean and KitKat was using apps (kingroot / kingo root / framaroot / iroot root king / towelroot) To get root permissions either in new versions such as Lollipop, Marshmallow, Nougat, Pie and future versions of the Android system, these applications do not work.


What is the difference between SuperSU and Magisk

 VS 

The main difference between Magisk and SuperSU is how the root works on Android. Based on what the user wants to do.
We will first talk about supersu root how to get the root where it installs itself within the system files It changes the system files and adds new files to the system partition on the phone, but with the enhancement of Google to protect Android it has become difficult to do so that the amendment to the partition of the Android system to send an alert to applications that are trying to detect the presence of root.
Google SafetyNet monitors the operating system from any manipulation, and when it detects any manipulation in the Android operating system, most applications will not work and will not send you OTA updates.
What about Magisk is one of the most important features that does not touch system files, but modifies the boot partition instead so that it can trick safetyNet service and show that everything is normal and allows Magisk Manager to fully control the root settings.


Notes before root process

  • Charge the battery well before use.
  • Use the original USB cable that came with the device.
  • Use the laptop at work to avoid electricity problems.
  • You should focus well to protect the binary of your device.
  • The following protections must be disabled (FRP - OEM - RMM/KG) Follow the following article to learn How to Disbled FRP and OEM for device Samsung Galaxy.


Device information

-Brand Name: Samsung Galaxy
-Device Name: Galaxy NOTE 20 5G
-Model: SM-N9810 root
-Operating system: Android Q 10 and R 11


Files required for root work

How To Root Galaxy N9810 android Q 10 / How To Root Galaxy N9810 android R 11

1-Download Drivers and flash Tool.
2-Install the drivers on your device.
3-Download Root File, The baseband version must match the version of the root file.
4-Open the EFTSU Flash Tool.
5-From the top, click on Select File and then choose the root file.
6-Boot your device into download mode prees Volume Down + Volume Up and connect the USB cable.
7-Press Flash to start.
8-After booting the device install EFTSU Manager app.
9-Then, from the EFTSU Flash tool, we click on Reboot ADB Device to Root Mode (Recovery mode).
10-When the boot is complete, Open the EFTSU Manager app to get the root.
11-You can check for root access through the root checker app.
12-In case you encounter any problems please feel free to contact us
13-If you want to unroot or revert to the offical firmware, you can flash new firmware.

How To Root Samsung Galaxy Note 20 5G SM-N9810

What is the root and what are the benefits and harms

Root is a program that gives the user full powers to control the operating system where it can modify the operating system files or delete in the sense of the most complete control of the phone.
How To Root Samsung Galaxy Note 20 5G SM-N981N

Root features:
1-Modify or delete files or applications of the operating system.
2-Run programs that require root permissions.
3-Change the basic fonts within the Android system.
4-Move applications from device memory to external memory.
5-Installation of Custom rom.
6-Fix errors DRK and DM-Verity.

Cons of the root:
1-Loss of phone warranty.
2-Some applications do not work due to root (bluestacks root / dr fone root).
3-Stand on the company logo as a result of misuse.
4-The operating system crashed due to deletion or modification of important system files.


important warning:
  • Installation and use of the root android is entirely at your own risk and we do not take any responsibility for device failure.
  • In older versions of the Android system such as Jelly Bean and KitKat was using apps (kingroot / kingo root / framaroot / iroot root king / towelroot) To get root permissions either in new versions such as Lollipop, Marshmallow, Nougat, Pie and future versions of the Android system, these applications do not work.


What is the difference between SuperSU and Magisk

 VS 

The main difference between Magisk and SuperSU is how the root works on Android. Based on what the user wants to do.
We will first talk about supersu root how to get the root where it installs itself within the system files It changes the system files and adds new files to the system partition on the phone, but with the enhancement of Google to protect Android it has become difficult to do so that the amendment to the partition of the Android system to send an alert to applications that are trying to detect the presence of root.
Google SafetyNet monitors the operating system from any manipulation, and when it detects any manipulation in the Android operating system, most applications will not work and will not send you OTA updates.
What about Magisk is one of the most important features that does not touch system files, but modifies the boot partition instead so that it can trick safetyNet service and show that everything is normal and allows Magisk Manager to fully control the root settings.


Notes before root process

  • Charge the battery well before use.
  • Use the original USB cable that came with the device.
  • Use the laptop at work to avoid electricity problems.
  • You should focus well to protect the binary of your device.
  • The following protections must be disabled (FRP - OEM - RMM/KG) Follow the following article to learn How to Disbled FRP and OEM for device Samsung Galaxy.


Device information

-Brand Name: Samsung Galaxy
-Device Name: Galaxy NOTE 20 5G
-Model: SM-N981N root
-Operating system: Android Q 10 and R 11


Files required for root work

How To Root Galaxy N981N android Q 10 / How To Root Galaxy N981N android R 11

1-Download Drivers and flash Tool.
2-Install the drivers on your device.
3-Download Root File, The baseband version must match the version of the root file.
4-Open the EFTSU Flash Tool.
5-From the top, click on Select File and then choose the root file.
6-Boot your device into download mode prees Volume Down + Volume Up and connect the USB cable.
7-Press Flash to start.
8-After booting the device install EFTSU Manager app.
9-Then, from the EFTSU Flash tool, we click on Reboot ADB Device to Root Mode (Recovery mode).
10-When the boot is complete, Open the EFTSU Manager app to get the root.
11-You can check for root access through the root checker app.
12-In case you encounter any problems please feel free to contact us
13-If you want to unroot or revert to the offical firmware, you can flash new firmware.

How To Root Samsung Galaxy Note 20 5G SM-N981N

What is the root and what are the benefits and harms

Root is a program that gives the user full powers to control the operating system where it can modify the operating system files or delete in the sense of the most complete control of the phone.
How To Root Samsung Galaxy Note 20 5G SM-N981B

Root features:
1-Modify or delete files or applications of the operating system.
2-Run programs that require root permissions.
3-Change the basic fonts within the Android system.
4-Move applications from device memory to external memory.
5-Installation of Custom rom.
6-Fix errors DRK and DM-Verity.

Cons of the root:
1-Loss of phone warranty.
2-Some applications do not work due to root (bluestacks root / dr fone root).
3-Stand on the company logo as a result of misuse.
4-The operating system crashed due to deletion or modification of important system files.


important warning:
  • Installation and use of the root android is entirely at your own risk and we do not take any responsibility for device failure.
  • In older versions of the Android system such as Jelly Bean and KitKat was using apps (kingroot / kingo root / framaroot / iroot root king / towelroot) To get root permissions either in new versions such as Lollipop, Marshmallow, Nougat, Pie and future versions of the Android system, these applications do not work.


What is the difference between SuperSU and Magisk

 VS 

The main difference between Magisk and SuperSU is how the root works on Android. Based on what the user wants to do.
We will first talk about supersu root how to get the root where it installs itself within the system files It changes the system files and adds new files to the system partition on the phone, but with the enhancement of Google to protect Android it has become difficult to do so that the amendment to the partition of the Android system to send an alert to applications that are trying to detect the presence of root.
Google SafetyNet monitors the operating system from any manipulation, and when it detects any manipulation in the Android operating system, most applications will not work and will not send you OTA updates.
What about Magisk is one of the most important features that does not touch system files, but modifies the boot partition instead so that it can trick safetyNet service and show that everything is normal and allows Magisk Manager to fully control the root settings.


Notes before root process

  • Charge the battery well before use.
  • Use the original USB cable that came with the device.
  • Use the laptop at work to avoid electricity problems.
  • You should focus well to protect the binary of your device.
  • The following protections must be disabled (FRP - OEM - RMM/KG) Follow the following article to learn How to Disbled FRP and OEM for device Samsung Galaxy.


Device information

-Brand Name: Samsung Galaxy
-Device Name: Galaxy NOTE 20 5G
-Model: SM-N981B root
-Operating system: Android Q 10 and R 11


Files required for root work

How To Root Galaxy N981B android Q 10 / How To Root Galaxy N981B android R 11

1-Download Drivers and flash Tool.
2-Install the drivers on your device.
3-Download Root File, The baseband version must match the version of the root file.
4-Open the EFTSU Flash Tool.
5-From the top, click on Select File and then choose the root file.
6-Boot your device into download mode prees Volume Down + Volume Up and connect the USB cable.
7-Press Flash to start.
8-After booting the device install EFTSU Manager app.
9-Then, from the EFTSU Flash tool, we click on Reboot ADB Device to Root Mode (Recovery mode).
10-When the boot is complete, Open the EFTSU Manager app to get the root.
11-You can check for root access through the root checker app.
12-In case you encounter any problems please feel free to contact us
13-If you want to unroot or revert to the offical firmware, you can flash new firmware.

How To Root Samsung Galaxy Note 20 5G SM-N981B

What is the root and what are the benefits and harms

Root is a program that gives the user full powers to control the operating system where it can modify the operating system files or delete in the sense of the most complete control of the phone.
How To Root Samsung Galaxy Note 20 SM-N980F

Root features:
1-Modify or delete files or applications of the operating system.
2-Run programs that require root permissions.
3-Change the basic fonts within the Android system.
4-Move applications from device memory to external memory.
5-Installation of Custom rom.
6-Fix errors DRK and DM-Verity.

Cons of the root:
1-Loss of phone warranty.
2-Some applications do not work due to root (bluestacks root / dr fone root).
3-Stand on the company logo as a result of misuse.
4-The operating system crashed due to deletion or modification of important system files.


important warning:
  • Installation and use of the root android is entirely at your own risk and we do not take any responsibility for device failure.
  • In older versions of the Android system such as Jelly Bean and KitKat was using apps (kingroot / kingo root / framaroot / iroot root king / towelroot) To get root permissions either in new versions such as Lollipop, Marshmallow, Nougat, Pie and future versions of the Android system, these applications do not work.


What is the difference between SuperSU and Magisk

 VS 

The main difference between Magisk and SuperSU is how the root works on Android. Based on what the user wants to do.
We will first talk about supersu root how to get the root where it installs itself within the system files It changes the system files and adds new files to the system partition on the phone, but with the enhancement of Google to protect Android it has become difficult to do so that the amendment to the partition of the Android system to send an alert to applications that are trying to detect the presence of root.
Google SafetyNet monitors the operating system from any manipulation, and when it detects any manipulation in the Android operating system, most applications will not work and will not send you OTA updates.
What about Magisk is one of the most important features that does not touch system files, but modifies the boot partition instead so that it can trick safetyNet service and show that everything is normal and allows Magisk Manager to fully control the root settings.


Notes before root process

  • Charge the battery well before use.
  • Use the original USB cable that came with the device.
  • Use the laptop at work to avoid electricity problems.
  • You should focus well to protect the binary of your device.
  • The following protections must be disabled (FRP - OEM - RMM/KG) Follow the following article to learn How to Disbled FRP and OEM for device Samsung Galaxy.


Device information

-Brand Name: Samsung Galaxy
-Device Name: Galaxy NOTE 20
-Model: SM-N980F root
-Operating system: Android Q 10 and R 11


Files required for root work

How To Root Galaxy N980F android Q 10 / How To Root Galaxy N980F android R 11

1-Download Drivers and flash Tool.
2-Install the drivers on your device.
3-Download Root File, The baseband version must match the version of the root file.
4-Open the EFTSU Flash Tool.
5-From the top, click on Select File and then choose the root file.
6-Boot your device into download mode prees Volume Down + Volume Up and connect the USB cable.
7-Press Flash to start.
8-After booting the device install EFTSU Manager app.
9-Then, from the EFTSU Flash tool, we click on Reboot ADB Device to Root Mode (Recovery mode).
10-When the boot is complete, Open the EFTSU Manager app to get the root.
11-You can check for root access through the root checker app.
12-In case you encounter any problems please feel free to contact us
13-If you want to unroot or revert to the offical firmware, you can flash new firmware.

How To Root Samsung Galaxy Note 20 SM-N980F

NOKIA TA-1204 HARD RESET DONE

NOKIA TA-1204 FORMAT TO REMOVE USER LOCK


NOKIA TA-1204 FORMAT TO REMOVE USER LOCK


NOKIA C2 TA-1204 SPICIFICATIONS


  • PLATFORM OS Android 9.0 Pie (Go edition)
  • Chipset Unisoc (28nm)
  • CPU Quad-core 1.4 GHz
  • MEMORY Card slot microSDXC (dedicated slot)
  • Internal 16GB 1GB RAM eMMC 5.1
  • NETWORK Technology GSM / HSPA / LTE
  • BODY Dimensions 154.8 x 75.6 x 8.9 mm (6.09 x 2.98 x 0.35 in)
  • Weight 161 g (5.68 oz)
  • Build Glass front, plastic back, plastic frame
  • SIM Single SIM (Nano-SIM) or Dual SIM (Nano-SIM, dual stand-by)
  • DISPLAY Type IPS LCD
  • Size 5.7 inches, 83.8 cm2 (~71.6% screen-to-body ratio)
  • Resolution 720 x 1440 pixels, 18:9 ratio (~282 ppi density)
  • MAIN CAMERA Single 5 MP, f/2.2, AF
  • Features LED flash, HDR
  • Video 720p@30fps
  • SELFIE CAMERA Single 5 MP
  • Video 720p@30fps
  • SOUND Loudspeaker Yes
  • 3.5mm jack Yes
  • COMMS WLAN Wi-Fi 802.11 b/g/n, hotspot
  • FEATURES Sensors Accelerometer, proximity
  • BATTERY Type Li-Ion 2800 mAh, removable
  • Bluetooth 4.2, A2DP, LE
  • GPS Yes, with A-GPS
  • NFC No
  • Radio FM radio
  • USB microUSB 2.0

NOKIA C2 TA-1204 HARD RESET


The device comes with a spread processor


FILE TO RESET USER LOCK OF NOKIA TA-1204


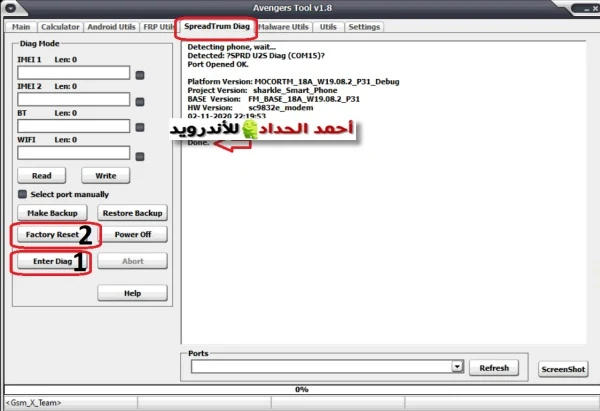
PHOTO EXPLAIN THE PROCESS

NOKIA C2 TA-1204 HARD RESET


NOKIA TA-1204 HARD RESET DONE

NOKIA TA-1204 HARD RESET DONE

NOKIA TA-1204 FORMAT TO REMOVE USER LOCK


NOKIA TA-1204 FORMAT TO REMOVE USER LOCK


NOKIA C2 TA-1204 SPICIFICATIONS


  • PLATFORM OS Android 9.0 Pie (Go edition)
  • Chipset Unisoc (28nm)
  • CPU Quad-core 1.4 GHz
  • MEMORY Card slot microSDXC (dedicated slot)
  • Internal 16GB 1GB RAM eMMC 5.1
  • NETWORK Technology GSM / HSPA / LTE
  • BODY Dimensions 154.8 x 75.6 x 8.9 mm (6.09 x 2.98 x 0.35 in)
  • Weight 161 g (5.68 oz)
  • Build Glass front, plastic back, plastic frame
  • SIM Single SIM (Nano-SIM) or Dual SIM (Nano-SIM, dual stand-by)
  • DISPLAY Type IPS LCD
  • Size 5.7 inches, 83.8 cm2 (~71.6% screen-to-body ratio)
  • Resolution 720 x 1440 pixels, 18:9 ratio (~282 ppi density)
  • MAIN CAMERA Single 5 MP, f/2.2, AF
  • Features LED flash, HDR
  • Video 720p@30fps
  • SELFIE CAMERA Single 5 MP
  • Video 720p@30fps
  • SOUND Loudspeaker Yes
  • 3.5mm jack Yes
  • COMMS WLAN Wi-Fi 802.11 b/g/n, hotspot
  • FEATURES Sensors Accelerometer, proximity
  • BATTERY Type Li-Ion 2800 mAh, removable
  • Bluetooth 4.2, A2DP, LE
  • GPS Yes, with A-GPS
  • NFC No
  • Radio FM radio
  • USB microUSB 2.0

NOKIA C2 TA-1204 HARD RESET


The device comes with a spread processor


FILE TO RESET USER LOCK OF NOKIA TA-1204


PHOTO EXPLAIN THE PROCESS

NOKIA C2 TA-1204 HARD RESET


NOKIA TA-1204 HARD RESET DONE

تشغيل بوكس Avengers Tool 1.8 بدون بوكس


Avengers Tool 1.8 without box


مميزات Avengers Tool 1.8

https://youtu.be/2dtPikwU54E


مميزات اساسية Avengers Tool 1.8

  • Direct Unlocks several phones with security
  • This amazing tool can be used  for Software Repair
  • Simple and way to calculate Unlock Codes By IMEI
  • FRP *Factory Reset Protection Lock Remove
  • Reactivation Lock Reset
  • You can unlock Network Lock
  • Unlock Sim Provider Lock

الميزة الاهم حسب تجربتي للبوكس هو فورمات الهواتف بمعالج سبريد SPREAD من وضع الدياق ومنها هواتف نوكيا التي لم يكن لها حل سوى على بوكسات رسمية مثل CM2 وغيرها


اقرا ايضا: NOKIA TA-1204 HARD RESET DONE


شرح تثبيت افنجرز 1.8 بدون بوكس


عبارة عن ملف EXE يتم تثبيته وبعد التثبيت يتم تشغيله كأي برنامج ستظهر لك الشاشة التالية


اضغط على START ومبروك


تنزيل Avengers Tool 1.8


PASSWORD= AHMED_HADDAD


تعاريف nokia spd usb


تشغيل بوكس Avengers Tool 1.8 بدون بوكس

تشغيل بوكس Avengers Tool 1.8 بدون بوكس


Avengers Tool 1.8 without box


مميزات Avengers Tool 1.8

https://youtu.be/2dtPikwU54E


مميزات اساسية Avengers Tool 1.8

  • Direct Unlocks several phones with security
  • This amazing tool can be used  for Software Repair
  • Simple and way to calculate Unlock Codes By IMEI
  • FRP *Factory Reset Protection Lock Remove
  • Reactivation Lock Reset
  • You can unlock Network Lock
  • Unlock Sim Provider Lock

الميزة الاهم حسب تجربتي للبوكس هو فورمات الهواتف بمعالج سبريد SPREAD من وضع الدياق ومنها هواتف نوكيا التي لم يكن لها حل سوى على بوكسات رسمية مثل CM2 وغيرها


اقرا ايضا: NOKIA TA-1204 HARD RESET DONE


شرح تثبيت افنجرز 1.8 بدون بوكس


عبارة عن ملف EXE يتم تثبيته وبعد التثبيت يتم تشغيله كأي برنامج ستظهر لك الشاشة التالية


اضغط على START ومبروك


تنزيل Avengers Tool 1.8


PASSWORD= AHMED_HADDAD


تعاريف nokia spd usb


تشغيل بوكس Avengers Tool 1.8 بدون بوكس

SIMUNLOCKER PRO 4.7.2 - New Era Update "World First" Continues


Work with Intelligence Sim-Unlocker

Introduce our New Update With Enjoy Holidays With Hot Models Unlock

New Era start so now we will add Soon Alot more thing with 1 click

Add Unlock on Next Models : PROMO
S10 ATT AIO CCT CHA
WORLD FIRST NO COMBO NEEDED
FREE FREE
Enjoy Holidays and again FREE FREE FREE
Add Support for New Security on Next Models :
SM-G970U BIT3 BIT4
SM-G973U BIT3 BIT4
SM-G975U BIT3 BIT4
NO COMBO NEEDED
Enjoy Holidays

PROMO LASTS UNTIL JANUARY 3ND.
PROMO DUARA HASTA EL 3 DE ENERO.

Also MORE Improvements

WORK WITH INTELIGENCE : KEEP RUNNING


Telegram Chanel:-

Official FaceBook Page:-


Support Link:-


Buy Credits

class="im_message_webpage_article" ng-switch-default="" style="box-sizing: border-box;" >


SIMUNLOCKER PRO 4.7.2